
Monday, May 30, 2011
COLORS BUSY BAG
THIS WEEK: Make a "colors" busy bag by creating color cards with objects for your child to match. Create the cards by drawing a square of a primary color onto a small paper or cardsctock then laminate (if desiered). Find objects around the home, like Matchbox cars, Legos, those little "fuzzy" balls that you buy in the craft aisle, etc. Ask your child to lay the object onto the card with the same color. Place in a ziploc bag or make a simple bag to carry in. For older kids, collect many different paint sample cards of non-primary colors at the paint/hardware store, a pad of paper, and some colored pencils. Ask your child to try and match the paint samples by blending colors with the pencils. Point out that they are creating secondary and tertiary colors. Or, they can simply play I SPY looking for objects that match each paint sample card, and draw that object in the notebook.
Friday, May 27, 2011
GRADUATION ANNOUNCEMENT

Okay so I talked a little about photography last week and I mentioned how I like to use Adobe Photoshop Elements. My awesome niece and nephew (twins) are graduating from high school this year and they needed a graduation announcement. They are super great kids and I love that I was given the chance to do this for them! I put my Adobe Photoshop Elements to work and created the announcement above.
The cute photos were fairly traditional and straight forward so I kept the announcement clean and simple. I didn't even import special digital papers, I just used the rectangle tool in the tool bar of Adobe Photoshop Elements, couldn't be more simple.
First, I re-sized the photos and placed them where I wanted them.
Second, I added some rectangles of color in green and gray.
Third, I created my text boxes and added the text. The most difficult part was deciding on colors of the text and boxes.
That's it! Now, all that is left is to take this to a place like Costco or Walmart photocenter website, drop it into one of their "make your own" templates and get 40 large card announcements with envelopes for about $15. Not bad, right?
Do you have anyone graduating from preschool or Kindergarten? This is an easy way to share the news with your family!
Congratulations Brooke & Brandon! You guys always make me so proud!
Wednesday, May 25, 2011
THE LUNCH BAG BLUES
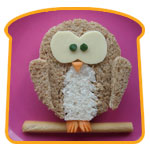
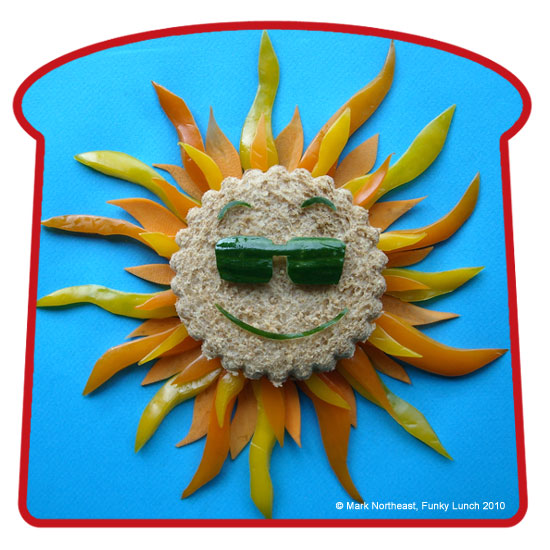
It's that time of the year when I begin to run out of steam as to what to put in the lunch box. Which is why I was so excited to see this page of cute sandwich ideas from FUNKY LUNCHBOX!

I have one daughter who loves surprises in her lunchbox and adores sheep so after checking out their website I threw this sandwich together for her. She loved it! It doesn't have to be picture-perfect, (mine certainly isn't) it just has to be fun. I just used a regular paring knife to cute the shapes. Later, I realized cheese would have made better eyeballs than the cucumber slice, duh. But all in all it was a successful effort from my daughter's point of view anyway, and that is the one which counts.
You can find templates for your bread slices here.
My son would NOT like to be surprised by a cute sandwich. I thought he would love the cute little Star Wars sandwiches I made using this but nope, he threw them away because he didn't like something different in his lunch box!! Later when I warned him ahead of time he was fine with it. I am thinking he would really enjoy these funky sandwiches if he was involved in making them.
We might try this one together:
 That is done with a simple vegetable peeler and skin of a cucumber. I know my son wouldn't like the skin, but if he made it himself he might be willing to eat the letters, which I think are the inside of the cucumber, but cheese would work too. The Funky Lunch people suggest using cleaned up Marking Pen lids to cute small circle, or even the lid from your milk carton. They also use the cake decorating tips for the little tiny circles for eyes.
Anyway, wishing you luck hanging in there for those last few school lunches!! Oh, these little sandwiches might be great for summer picnics or poolside too!
Monday, May 23, 2011
Remembering


Today for some reason I was remembering back when my son was potty training and he tried to deceive us on the sticker chart. See if you can spot his deception. Little stinker. My youngest will soon be two, and I am starting to ponder the potty training thing again. I have told myself that I am not going to stress this time. It will happen when it happens. Um, ....right..?
Friday, May 20, 2011
Document Those First Years - Wrap Up

Well, at least I think this is a "wrap-up". No promises this won't be revisited in the future. Taking pictures of our life is a main priority in my house. My mom put a camera in my hand when I was six and I have never stopped seeing the world through a lens since.
First off, it occurred to me not everyone may know the basics of playing around with their photos. As for what I use, I depend on Adobe Photoshop Elements for editing my pictures. This is not as expensive as the full Photoshop and it does about 96% of what I need and it is 100's of dollars cheaper than Photoshop. Students can buy it cheaper. My camera is a Nikon D80 DSLR which is still awesome despite being almost 5 years old now, and yes I am a Nikon snob but many of my friends love their Canons.
If you are just getting started taking pics of your family, some fun sites to check out are:
I HEART FACES who not only have fun photo contests each week (even for the beginner), they also have some getting started, basic tutorials.
Becky's Blog- Becky Higgins - has wonderful, very basic to advanced, real-life photo tutorials and projects. Becky has created "Project Life" which is a simple way of documenting your everyday experience for you and your children. I love the concept and know this would be something for my family to treasure but I haven't taken the plunge yet (anyone want to buy it for me?) I've been a follower of Becky's since her very first scrapbooking days with Creating Keepsakes Scrapbooking Magazine, (now empire), she's amazing! She is the expert about documenting your child's lives.
Pioneer Woman Photography - if you haven't heard of her yet you must be newly born because she is everywhere and with reason. She is a blogger, and self-taught photographer who probably started it all with her awesome tutorials. It is a must see.
There are many fun sites for adding special effects or text onto your photos. Photobucket and Picnik are worth a visit. Photobucket is an awesome resource and a good place to start as any. Picnik has many different fun effects including one-click teeth whitener that gives everyone that Hollywood smile!
If you are an Iphone or Droid user, there are some pretty amazing apps that will take your camera phone shots to the next level. You really can get amazing results with a camera phone these days. I think this is where things will be going in the future. How many times have you wished your eyeballs were a camera? I have seen so many moments I wished I could capture forever but missed them because I didn't have my camera with me and figured my iphone camera wouldn't be worth bothering with. I was wrong. Check out this article from Photojojo to see what I mean. Also, you might just want to join Photojojo while you're there, a free photo newsletter which is very up to date on the latest and greatest in the world of photography.
I know this is nowhere near a comprehensive list, just what I have found very helpful so far. Feel free to comment and tell me which photo sites you enjoy!
Here are a few more adorable photos that I have seen on the blogs and had to share. Actually, the first one (seen at the top) is by my friend Lori. I saw this and asked her if I could include it on my blog. I love the sweet and simple way she is documenting her daughter Reese's milestones. Adorable!! Lori used Adobe Photoshop to write the text onto the photo, but the websites Photobucket and Picnik listed above would do this too. Isn't it sweet?! I can't see this pic and not smile! This is a great way to help long-distance family stay current with your little one, just print out that cute picture as a regular 4X6 or 5X7 and mail it as a postcard, or yes, email it or post on Facebook.
 One more way to document the first year. If you haven't seen my previous posts on doucmenting your pregnancy or child's first year see this and this. I love this one above from ODEEDOH because it is so simple and I love the way the baby is laying or sitting differently in each one, showing some personality.

Love the blue pregnancy shot above. I tried this one, but my black shirt disappeared too much against the brown wall and it was hard to tell what the big bump my son was hugging was. I included it above to show you what not to do. Even though it's imperfect it still has much meaning to me, so an imperfect shot is always better than one you didn't take at all. Anyway, I love the light blue belly against the blue wall seen above. Make sure your nice fat belly is visible! This was from Becky Higgins.

I LOVE this. I so didn't have the guts to do this with kids numbers one, two or three. I was too worried that the special first birthday outfits would get (gulp) ruined. Lame right? Why didn't I just strip them down to diapers and let them get at that cake? I finally summoned the courage with baby number four and wouldn't you know it but she wanted nothing to do with that cake. Wouldn't even touch it and frankly was irritated at us for even suggesting such a thing. (Big sigh) I tried. Anyway, I LOVE the colors in this one which is from Photography by Megan.
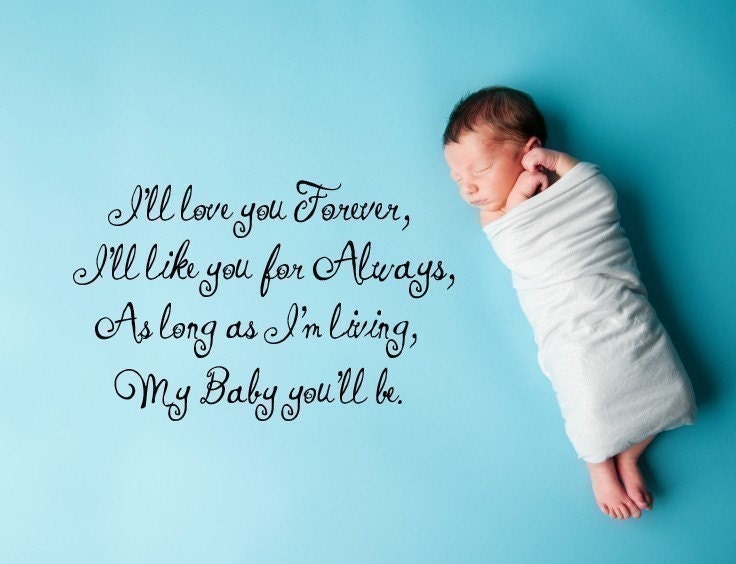
This pic is from this etsy shop, selling this cute vinyl lettering. I LOVE this idea and again, a great way to use photobucket, picnik or a program like Adobe Photoshop Elements or Photoshop to add this text to your photo. Doesn't even have to be a newborn.
Phew! Thank you for sticking with me. Good luck documenting your awesome families. I'd love to see or at least hear about your pictures!
- Becca
Thursday, May 19, 2011
CALIFORNIA BABY SHAMPOO & BODY WASH
First off, I want you do know I have not received any freebies, rewards or money for this post. This is just an honest testimonial for an awesome product.
I have four children and have always struggled finding a shampoo for them that doesn't irritate their eyes AND is gentle on their hair. I don't know if you are aware how harsh most baby shampoo's are on hair. Some people go the route of using adult, good quality shampoo and use a baby visor to keep the shampoo out of the eyes. I think that works great though, we are a swim team family, and I like my babies to get use to the water right from the beginning. Once kids get that fear of putting their face in the water thing it can take some time to get past it. But if visor thing works for you, that is awesome, we all need to do what works for our own families.
My friend Kim told me how much she liked the CALIFORNIA BABY SHAMPOO & BODY WASH. I had seen it in the aisle at Target but I could never make myself pay the extra cost. Finally, after trying the 6th brand of shampoo that professed to be "gentle" and feeling like it was stripping my daughter's hair down to straw, I knowing that Kim liked it, I decided to spend the extra few bucks. And, may I say YAY! This shampoo is excellent! It is not harsh at all, it is all natural AND it leaves her hair feeling soft! From the moment I rinse her hair, I can still feel a layer of softness coating the strands. Also, it is so concentrated that I use half of what I used with the other shampoos so in the long run it isn't even more expensive, great right?!
Last thing, they many different varieties of this shampoo, one of them having Tea Tree Oil in it. I know there are some states having a horrible time with LICE right now, it seems like it goes through our school every spring. Blame baseball and softball shared helmets. I have heard that Lice avoid hair with Tea Tree Oil in it. I use shampoo with Tea Tree Oil on my kids hair intermittently just to try and stave off any lice, so far so good, (knock on wood). I also spray my kids hair daily, especially in the spring, with whatever styling product I have on hand because I also have heard lice don't like hair with product in it.
So anyway, short story long, I love this shampoo, and not just because I am a "California Girl" either.
Tuesday, May 17, 2011
FREE Printable ABC cards


Have you seen these? They were listed on MoneySavingMom's website today. There are so many uses for these beautiful retro flash cards. I think they are adorable in a play room but wouldn't they also be great in all sorts of DIY crafts? I can picture them in scrapbook pages, decoupaged onto playroom furniture, I think they would even make an adorable charm bracelet! Wouldn't they. I think I might like to try that. Anyway, they are FREE and yours for the taking, so go soldier GO! Then, tell me how you might use them.
Monday, May 16, 2011
Document the FIRST YEAR
In my previous post we discussed documenting your pregnancy. I just saw a very cute way to document the next step, the FIRST YEAR of your little one. I like this idea from Famille Summerbelle because I am a sucker for felt letters but also, I like that the pose is kept the same so you can really see the subtle differences in the way this baby has changed over the first year of his life. Notice that they started at 3 months not at newborn! So don't sweat it if you didn't get the exact cute adorable newborn photos. I found getting photos of little bits of newborns was easier than one picture of the entire baby, like just the face, eyes, nose, hands, belly and ears, oh and of course those adorable toes. But my point is, start where you are, right now, whatever age you child is. Okay okay, going over to your 42 year-old son and asking if you can take pics of his feet may be pushing it, but maybe you can get pictures of your son's feet side by side with his son's feet?! Where there is a will, there is a way to capture a beautiful, cherished family photo.
Speaking of feet, I love this by Becky Higgins. I saw this on her blog the other day and was raking my brain for where I had put similar pictures that I have. Just one more reason to make certain you have your photos in order. I have taken shots like this but, one was in my pre-digital phase in an unmarked shoe box, one is stuck in Picassa somewhere, maybe, and one other may have been lost altogether in a non backed-up hard drive, yeah, that was bad day..
I still have hopes of doing something like this though, it is just too sweet.

I'd love to hear about or see your ideas on documenting your pregnancy or the first year of your babies life!
TEXTURES

Discover textures. There are all sorts of fun ways to explore textures. One fun way is to cut out different clothes shapes out of different materials, sandpaper, thin paper, felt, tissue paper, wrapping paper, different fabrics, tin foil, etc. Then, string up a "clothesline" in the house, or outside if you prefer, give your kids some clothes pins and let them go have fun "hanging" the different textured clothes. What words best describe these textures? You might be surprised at how long this will keep them busy!
Thursday, May 12, 2011
Document Your Pregnancy


In honor of Mother's Day I wanted to share some fun ideas I have seen recently for documenting and sharing your pregnancy. I think here at my house we are finally done adding to our brood, so I won't be able to have fun with these ideas, but I hope you will!
This first one from Mama Mia's Maternity Book is so cute and clever! These are pics of a book that this mom had printed, of each week of her pregnancy. I thought this would also be cute done as little 5x7 cards, then you could mail them out to your loved ones along the way. Then of course, later made into a book to treasure.


Now this next one, from Simply Bloom Photography, I love because I love the way she has her dog and her husband in a couple of shots. So sweet. I had started something like this with my second baby, then hated how fat I was getting and stopped. DON'T you do that!! Everyone told me I would want to see these pics later, and I thought, "no way will I ever want to see my face that fat ever again, but of course, they were right and I was (dang it) wrong!! Don't worry if you didn't start your first trimester of pregnancy either, just start from where you are and it will still be awesome, promise! Think of a way to include the month number in your photo in a way that represents you, but keep it simple so it is easy to change each week.

Okay, here is one picture I love. This is from David and Natalie Fenn blog. It would make a cute baby announcement but I think it would be a great photo just to have in the nursery and for posterity. It's simple, beautiful and easily done, just get some good light, like near a window in the morning or late afternoon, and a simple shirt and go to town. The wonderful thing about digital pics is you can take 3o shots and it doesn't cost you anything extra, so take a ton in different lighting to get the one you like. Write down what time of day that was so you can recreate that when baby arrives for your second photo shoot.


Wednesday, May 11, 2011
A Fun Way to Present A School Project - Roller Box

I want to share an idea that is so old it's new! A ROLLER BOX! This is a fun project for when your child is given an open-ended assignment in which they are to make something, like a poster, diorama, etc. to display the information.
The best part it's very easy to do and kids love it! All you need is a cardboard box, (the size is up to you), paper that will fit the width of that box, two dowels or tubes long enough to span the width of the box, and art supplies, photos or whatever you are including in your project.
For example, my son in Kindergarten was assigned a research project on the Okapi, an animal from Central Africa. We had fun gathering all sorts of fun facts about the Okapi. Then, we took a roll of paper like you put in children's art easils, mine is from IKEA and got to work drawing out our information all down the length of the roll. If you don't have rolled paper, no problem, just fill up many pages of paper, and tape them all together so they make up one long piece. One of my favorites in this particular project was my son's life size drawing of an Okapi calf. So cute!
 Side of box with gift-wrap tubes extending out the sides.
Once you have all of the information you want to include and the long roll of paper is complete, it's time to make your box. I like to get my boxes from the bakery section of the grocery store, they always have the best boxes, just ask and they are happy to give you a nice sturdy box. Cut a rectangle into a box to match the width of your paper, as if your box is the "tv" and your paper is the "screen". Then, insert dowels, paper towel tubes, gift wrap tubes, or whatever you have that is long enough to extend out each side of the box about 3 or 4 inches. I used gift-wrap tubes because we chose to make our box fairly big. Make holes on the side of the box, large enough to fit the dowel or tube through, the fit should be snug. You should have one dowel or tube on the top, and one on the bottom. You can decorate the outside of the box if you'd like, I like to keep mine simple so that I can adapt it to each project.
When your box is assembled, tape the top edge of your paper roll to the top tube and roll it up as if it were a roll of paper towels. Once you get to the bottom edge of the roll, tape that edge to the lower roll/dowel. Roll your top dowel back to the beginning and you're done! Your child can narrate their project while the manually scroll through their report. It is like a low-tech Powerpoint and the kids love it!
This project is also very fun when used with a group of kids. Each child is given a piece of paper to make a drawing on the given topic and when done the pages are quickly taped together and added to the roller box. I have done this for kids of multiple ages and it they all love it when their picture comes on "screen". Great for Sunday School classes!
I have some ideas for other uses for roller boxes coming up soon!
Monday, May 9, 2011
Giveaway at TATERTOTS & JELLO

I love photography, which is why I am so excited about the current giveaway at TATERTOTS & JELLO. It is about a product called LIGHTSCOPE which attaches to your camera and is a quick fix for lousy indoor lighting. Go see and good luck!!
Friday, May 6, 2011
ANIMALS

THIS WEEK: Mid to late spring is a great time to visit the zoo! There are usually a few newborns to admire and the weather is perfect for animal watching. This week, choose a zoo animal and start researching. What does it eat? How tall is it? What is the baby called? Learn some fun facts specific to that animal. When you have your info, make a project of that animal. maybe poster, powerpoint, video, little book, paperbag puppet, a roller box (see post later this week) Have fun with it, then later this week, or sometime soon, go visit that animal at the zoo!
For more about the roller box see this post.
ANGRY BIRDS PIZZA

I saw this the other day from Happy Healthy Life and couldn't put it out of my head until I tried to make it. My kids love that little angry red bird (a popular iphone app/game) and I thought it was too cute. The only difficulty I had was that this picture is a personal-sized pizza a I wanted to make a family-sized pizza. The difficulty was that the scale for the face was all wrong because on a large pizza, the pepperoni eyeballs were not large enought to get the right effect. SOLUTION that I did not think of in time for the oven, is to use Canadian Bacon for the eyeballs instead of pepperoni. Duh! Still my kids got a kick out of it. Also, I got the chance to improve my pizza dough making. I found this website a great source for making your own pizza dough, it even includes a short tutorial on how to knead pizza dough.
Also, the above angry bird is made with soy pepperoni and I used regular pepperoni (which admittedly is much less healthy), this did make my pizza more greasy, I also think I used too much cheese (I love cheese), next time I'll have to use a little less cheese and fewer pepperoni.

All in all a good effort and I am looking forward to trying it again with less cheese, fewer pepperoni and using Canadian Bacon for the eyes.
Wednesday, May 4, 2011
How to Make A Fort - the easy way
 If your kids are in the fort building business than you know what it is like to have your couch cushions seemingly everywhere but ON the couch, right? My husband and I have sworn never to buy a couch with removable anything ever again. Having said that, those couches are not quite as comfy :0( . Well, I just saw something over at Saltwater Kids that was amazing. All it takes is your kitchen table, some inexpensive white roller shades and some Sharpies!! Check this out, cool right?!! The directions for the fort, from Country Living Magazine, where this idea originated are here. And while your over at Saltwater Kids check out all of her other fun fort-building ideas!
Tuesday, May 3, 2011
Pool Party Cake - Easter Clearance

I mentioned on my "ABC's" early learning side bar to the left about a use for plastic Easter eggs currently on clearance in many stores. I also want to mention that PEEPS freeze very well!! Sooooo, you might want to grab some of those while they are on clearance as well. We have been using our frozen PEEPS to make some of these at my house. The recipe actually calls for frozen Peeps so you don't even have to plan ahead.

These are great for snacks and lunches. I love that they are peanut free, so my kindergartner is allowed to have them for his mid-day snack. A lot of sugar I know, this is not his snack everyday I promise, I also make sure that his lunch is sugar-free that day.
But, wouldn't the cake at the top be an adorable cake for summer parties?! I might make this for my kids on their last day of school when we have our annual "Welcome SUMMER!" party. Get the recipe here.
Monday, May 2, 2011
ABC's
Don't throw away those plastic Easter eggs yet, or at least, buy some on clearance, I found a pack of the large sized plastic eggs at Target for just 25 cents. Use those eggs to help your children learn their ABC's and help children learn match upper case with lower case letters by writing the upper case letter on one half of the egg and write the lower case letter on the bottom half of the egg. Your kids will have fun trying to match up the eggs. Also, since my youngest is 21 months we will just be focusing on one letter this week. We will also use our egg to find things that start with that letter to put inside the egg.
PEDICURE Birthday Party

My ten-year-old celebrated her birthday party this weekend. What she really wanted to do was to take her two best school-friends to get pedicures and then have a slumber party. That sounded about as low-key as I could have asked for so I readily agreed, and why not get a pedicure for me too! Win-win, right?! They had a great time sitting in the over-sized massage chairs, sipping their Sprite's and feeling pampered. We let our guests decide where they wanted to get take out from and my husband swung by and picked up dinner awaiting the return of girls with the newly beautified toes. For cake, I had a small cake pan shaped like a foot (like the one seen here) and we thought it would be fun to let them each decorate their own foot cake complete with pretty "toe-nails".


This was my first time using the Wilton Icing Gel which gave us very vibrant, "nail polish" icing. I bought mine at Michael's using my 40% off coupon. Excellent! I liked the gel so much I will never go back to the regular food coloring. A little bit goes a long way too, so I think this small investment was worth every penny.

Then, we decided to make banners with the girls' names on them to decorate their bedrooms. The girls picked out their fabrics and traced a triangle template that I cut out of cereal box cardboard, and they also traced letters for their names. Each triangle was about 5" wide and 6" long. Now, a lot about banners have been all over the blogs and while I thought they were cute I didn't get what all the hub-bub was about. But seeing these in person I was very smitten with them. These banners are way cuter in person than in pictures. I am a bit addicted to banner-making now. I also like that I could just get 1/8th yard sized pieces of fabric which kept the cost down and allowed me to get many different fabrics for the girls to choose from. I used 1'' grosgrain ribbon that I folded in half over the top of each triangle, leaving about 1 1/2 inches in between each one. If you'd like to save money on ribbon, check out this idea for making your own, genius! I used 3M spray adhesive to attach my letters. A Silhouette Machine would have worked great for the letters as well, and they would have been so easy to just print out and iron on but I opted to have the girls trace and cut their letters.
The girls then watched the movie "Tangled", giggled for a bit and then went to sleep. (phew) In the morning, I made them M&M pancakes and gave them these cute goodie bags. Ta-daa! One birthday party completed.


Subscribe to:
Posts (Atom)