Friday, May 10, 2013

INSECT DAY

Insect Day, an annual tradition for all second graders at our school. Insect Day is a culmination of a year's worth of research, habitat building, designing, graphing, tracking, video-making, story-writing and massive amounts of collaborating. 
You would think that since my son is my third child to go through Insect Day I would be well prepared. Nope, late on a Tue night my son pops up beside my side of the bed and says "by the way I 
 need to dress up like a dragonfly on Friday, goodnight". My husband gave one of those "bummer, glad I'm not you" looks,  then fell blissfully asleep. I don't mind though, my husband is the go-to guy for all math homework, so I'm grateful.  
So it was on a Thursday evening that I found myself in Wal Mart hoping/praying for inspiration.  I looked for wire for the wings and after checking every section where such wire might be hiding, and re-checking those sections again with the help of a very sweet Wal Mart employee (who knew?), I was about to give up, but then the kind employee took pity on me and snagged me some wire coat hangers from the break room. Thanks to that little bit of kindness my creative juices kicked in and I grabbed some blue duct tape, and blue chenille stems and headed home. 

HOW I MADE A DRAGONFLY COSTUME 

Materials
--4 wire coat hangers, or wire thick enough to hold it's shape easily. 
--tennis ball for the eyes 
--blue baseball cap, one with air-vent grommets to put the antennae through 
--chenille stems for antennae, we used metallic blue because it looked the most "insecty"
--Blue duct tape
--tights for the body, I used an old pair of pink ballet tights and painted them, my son really wanted a green insect body, if you can find tights the color you'd like the body than you won't need to paint
--green poster paint unless you have colored tights, see above
--2 large safety pins 
--5 or 6 rubber bands 
--scratch paper or stuffing to form the thorax 
--plastic wrap 
-- felt, we used green, for center of wings 
--small wire to wrap wings together, could use duct tape instead
--enough elastic to go over the shoulders to keep wings on 

Tools
--wire cutters
--paint brush if you're painting 
--glue gun and glue 

Time needed
--comes together in an hour if you're NOT painting. If you are painting give yourself at least a day to air dry or an evening to use a hair dryer on it a couple of times. 

Directions
1. cut off one leg of the tights and use that for the thorax. We stuffed ours with wadded up scratch paper, but newspaper or stuffing/fiber fill would work too. I liked the stiffness of the scratch paper as it gave the final costume interesting movement. Just a matter of preference, my daughters might have liked the softer look stuffing would have given. 
2. If you don't have colored tights and are painting, now is the time to paint because it takes a long time to dry. I laid it out on newsprint and let my son  own this, he loved it. 
3. Begin shaping your wings by taking apart hangers and bending your wire. I really didn't need to do that much cutting because I used the "hook" ends in the center which gets covered up with felt. Make two sets of wings as shown in the above picture and secure them together at the center with small wire or duct tape. 
3. Wrap the wings with plastic wrap. This part was fun, we did 2 or 3 layers. 
4. Measure two pieces of elastic that will go onto center of wings and around each shoulder. 
5. Cut the elastic and secure onto the wings with duct tape. This should look like two loops for your child to put their arms through to wear the wings.  Secure further in step 6 before wearing. 
6. Take the felt and cut ovals and hot glue over the top of the elastic. This secures the elastic and hides/softens  the wired/taped centers of the wings. 
7. Cut tennis ball in half and cover completely with duct tape. These will be the eyes. The hollow side of ball is tricky, I put tape across the bottom first so that the layers on top would secure the bottom layers. 
8. I safety pinned the eyes onto the baseball cap (turned backward) from the underneath side, you could also hot glue it but this way we didn't ruin the cap. I covered the safety pins with duct tape inside the cap, for extra hold and comfort. 
9. Push the chenille stems up through grommets on the top of the cap. Most caps have these holes in just the right spot. Secure underside with duct tape. Shape antennae as desired. 
10. I covered any writing on the cap with more blue duct tape. 
11. Once thorax is dry, use rubber bands to shape the sections of the body. 
12. Wrap wire to secure thorax to wings. Cover in duct tape, to secure. You can also cover the duct tape by hot gluing felt over it. 

And that's it! My son had a great time being a dragonfly for a day. 
If you have a child that would like a more sparkly costume, like  my youngest daughter would, this could easily be glam'd up with some glitter and tulle. 

Friday, April 26, 2013

Kaden the Big Bro

So Kaden has been a big brother now for three and a half years.  I am still amazed at what a sweetheart he is to London.  We joined Kaden for the Fun Run today where they play lots of fun outdoor games together and compete with other classes for the most points. Of course this is all done as a fundraiser but at least everyone has fun. Kaden was very happy to see us, especially London, who he wanted to join his class in all the games. Thank you for being such a good brother Kaden, I am so grateful London has a brother like you. 


Sunday, January 6, 2013

Rowan is 14!


Can't believe my sweet Rowan is 14!  I look at this picture and I can honestly remember taking this photo as if it were yesterday. I was still hopelessly in love with this perfect little being. My entire life revolved around her every need.  I was completely smitten with her and loved being her mommy more than anything else in my life, ever.
Tim was working nights then, so one evening after dinner, she and I headed down the path that connected our backyard to Lake Elkorn. We walked along at dusk and I brought my camera to get a cute shot of her in her tutu. The one made by Grams that lined her Easter basket because Easter grass would have been too ordinary for my darling girl.  Rowan ran a bit away from me, around a bend in the path, and suddenly came running back to me as quickly as those little chubby legs could carry her. A jogger had been coming toward her so she decided it was time to get back to mom.  I took this pic right when she rounded the bend, back toward me "running for her life". The jogger, a man in his mid to late 20's gave me a big smile when he ran by and said  "adorable!" . I of course beamed knowingly. Yes, you are adorable Rowan, even now when I have let the realities of life of mothering now 4 children, I still think, for me you were the most perfect first little child I could have ever dreamed of. I cherish those days you and I had together, showing you the world, one butterfly, pearl necklace at a time. And still, even at 14 you are extremely, almost completely sweet. 


Monday, March 19, 2012

Organizing My Junk Drawers


So a few weeks back I posted here about how I am going to tackle an organizational chore or home improvement chore each month. I chose drawer organization for my first project and was VERY pleased at how easy it was and how GREAT it has been to have two (so far) very organized drawers. I followed the same exact directions as suggested by Brown Paper Packages and LOVE the results.

All you need is 1/4 inch thick poplar boards found at home improvement stores, some Gorilla Glue and a saw to cut the length of the boards. I cleaned out the drawers and sorted all the like objects together. I then sketched out a template based on how much room I would need for each item, for example the space I would need for my paper clips was smaller than the space I needed for all of the kids paintbrushes. My husband cut them to the right length for me because he likes the excuse to use the power tools and the rest was easy.

I was worried it was going to be a sticky, time consuming failure but it wasn't, I finished two drawers in an hour and that includes the fun part of putting all of your stuff back in the drawer into there own little compartments.

I realize it was a HUGE mistake not to have taken the "before" picture, but I was just in too big of a rush to dump out that mess and get started. I never knew we had so many rulers, calculators, dice or paint brushes! Now I know I don't have to worry about buying them the next time we contemplate a project, AND I know right were they are!

I feel so empowered!! Next project re-doing my daughter's room, from pink to pre-teen.

Update: Well, it looks like I have found someone to organize my entire life for me! She can organize yours too, go HERE to see for yourself.

I am linking this post to:

Friday, February 17, 2012

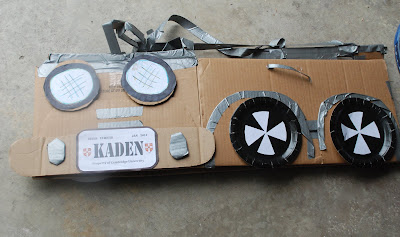
Cardboard Jeep


I came across these pictures the other day of my son's "Adventure Party". He is a big fan of Lego Indiana Jones on the WII and requested that for a party. Why can't my kids ever choose a theme that comes ready made at the party store? Anyway, it turned out very cute and I will blog more about it soon but I just wanted to share these jeeps in case anyone else was in the same dilemma. I wanted to provide each child with a way to "travel" the "Outback" looking for a stolen idol, because as you know, the idol 'should be in a museum!'. I wanted to make a cardboard jeep that didn't require any painting. There was 2 feet of snow on the ground at the time and freezing my fingers off painting 18 little cardboard cars was not something I wanted to do.

You will need:

Box
4 Black paper plates for tires
paper triangles for "hubcaps"
Silver duct tape (I used about four rolls for 18 jeeps)
Hot glue gun and glue sticks
personalized license plate made on the computer

The best boxes are from the bakery. That was a little tip I learned from a friend of mine that moved a lot and she was right, the boxes they ship cakes in are perfect. Costco type of bakeries are usually very happy to hand over their boxes.


These were jeeps that the kids could "where" and "drive" around, rather than sit it, so the bottom side was open as well. The bonus about that is the car could be folded flat and stored very easily.

I didn't cut the top flaps off of the boxes but folded them down to cover any of the writing on the outside which was great! The bottom side flaps I left on as well, folded them up and shaped to look like fenders by cutting them into ovals and folded those up and hot-glued into place. I decorated these with a bit of duct tape along the edge.

I glued on black paper plates as tires with some triangles cut from paper to look like hubcaps.


I trimmed off the shorter end, bottom flaps and cut those into bumper shapes for the front and back. I cut a few small ovals and covered them in silver duct tape to decorate the bumpers as well as printed off personalized license plates for each child. I glued on a piece of scrap cardboard in between the bumpers and the wheels to make the car look more 3-D.

The top, shorter end-flaps I cut little squares out of to resemble front and back windshields. I covered them in duct tape to give them more durability. The pictures shown here are taken a few months after the party and the jeep is looking like it needs to go into the shop for some detailing, but at the time of the party, the jeeps had very sturdy "windshields". I used more duct-tape for the straps that I criss-crossed over the top that allowed the children to "where" their jeeps and run around in them. They had so much fun "driving" all over the house looking for the "idol" while my party helpers threw "rocks" down on them from the upstairs. When they completed a few laps the next clue of the treasure hunt was sent down by a weighted balloon.

I should have gotten a picture of the pile of cars waiting on the deck for the party. It felt like quite an accomplishment and I won't lie, if I never make another cardboard jeep again I will be very happy. It was all worth it to see all those excited faces and hear the squeals of delight when they put on their jeep.

I know these were not very thorough directions so please feel free to ask me questions.

Thursday, February 9, 2012

VALENTINE'S DAY


Last Valentine's Day we found the Valentine idea pictured above just in time for my son to make them for close friends and family. Find link HERE. They were a BIG hit!! His teacher loved it so much that she took the valentine and displayed it in the teacher's lounge, which made my son all sorts of happy.
Our version is pictured above. I loved how easy this was to make and that we could personalize each one!

This year we saw this idea for a Harry Potter Lego Valentine from BOY TRIFECTA and instantly I knew what we had to do. The boys in my son's class are obsessed with Lego Ninjago right now, so I had him create a little Lego backdrop and we did a photo shoot with his favorite Lego Ninja "Cole". Again, so easy and my son LOVED it!

Here is how our LEGO NINJAGO valentines turned out:


Now for the teachers, close friends and family. I saw the idea shown below, from Funky Polka Dot Giraffe (lovin' that blot title, aren't you?) and had to make one too.
They even made their own heart lollipops with chocolate molds which is really cute, I like the little red and white tie that pulls it all together. I found some cute heart shaped chocolate lips at the Dollar Tree though and realized that they would save me some time, plus the foil looks nice on the photo. Another photo shoot and this was the result:


black and white version:
Fun right?! The photo quality is much better in person. I did give the color version a "vintage" feel, but the real thing isn't blue as it is appearing here. In any event, my son and I were both happy at how they turned out. Oh, and I did the writing on my photos in Photoshop Elements and the "muah" was written in the Cast Iron font which you can easily find as a free download on the internet.

I hope you have some fun ideas up your sleeves for the big day!