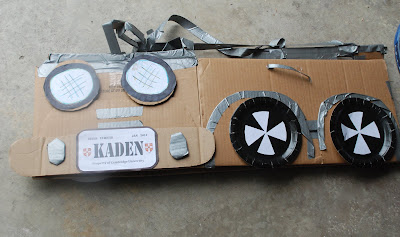
I came across these pictures the other day of my son's "Adventure Party". He is a big fan of Lego Indiana Jones on the WII and requested that for a party. Why can't my kids ever choose a theme that comes ready made at the party store? Anyway, it turned out very cute and I will blog more about it soon but I just wanted to share these jeeps in case anyone else was in the same dilemma. I wanted to provide each child with a way to "travel" the "Outback" looking for a stolen idol, because as you know, the idol 'should be in a museum!'. I wanted to make a cardboard jeep that didn't require any painting. There was 2 feet of snow on the ground at the time and freezing my fingers off painting 18 little cardboard cars was not something I wanted to do.
You will need:
Box
4 Black paper plates for tires
paper triangles for "hubcaps"
Silver duct tape (I used about four rolls for 18 jeeps)
Hot glue gun and glue sticks
personalized license plate made on the computer
The best boxes are from the bakery. That was a little tip I learned from a friend of mine that moved a lot and she was right, the boxes they ship cakes in are perfect. Costco type of bakeries are usually very happy to hand over their boxes.

These were jeeps that the kids could "where" and "drive" around, rather than sit it, so the bottom side was open as well. The bonus about that is the car could be folded flat and stored very easily.
I didn't cut the top flaps off of the boxes but folded them down to cover any of the writing on the outside which was great! The bottom side flaps I left on as well, folded them up and shaped to look like fenders by cutting them into ovals and folded those up and hot-glued into place. I decorated these with a bit of duct tape along the edge.
I glued on black paper plates as tires with some triangles cut from paper to look like hubcaps.

I trimmed off the shorter end, bottom flaps and cut those into bumper shapes for the front and back. I cut a few small ovals and covered them in silver duct tape to decorate the bumpers as well as printed off personalized license plates for each child. I glued on a piece of scrap cardboard in between the bumpers and the wheels to make the car look more 3-D.
The top, shorter end-flaps I cut little squares out of to resemble front and back windshields. I covered them in duct tape to give them more durability. The pictures shown here are taken a few months after the party and the jeep is looking like it needs to go into the shop for some detailing, but at the time of the party, the jeeps had very sturdy "windshields". I used more duct-tape for the straps that I criss-crossed over the top that allowed the children to "where" their jeeps and run around in them. They had so much fun "driving" all over the house looking for the "idol" while my party helpers threw "rocks" down on them from the upstairs. When they completed a few laps the next clue of the treasure hunt was sent down by a weighted balloon.
I should have gotten a picture of the pile of cars waiting on the deck for the party. It felt like quite an accomplishment and I won't lie, if I never make another cardboard jeep again I will be very happy. It was all worth it to see all those excited faces and hear the squeals of delight when they put on their jeep.
I know these were not very thorough directions so please feel free to ask me questions.

No comments:
Post a Comment